The right compost bin depends on what you're composting, how much space you have, and how hands-on you want to be. Here are the most common options for backyard composters.
Ready-Made Bins
Plastic Compost Bin
A plastic compost bin is the easiest way to get started. These enclosed bins handle both food scraps and yard trimmings, and are rodent-resistant when openings are 1/4 inch or less, the lid fits tightly, and the bottom is enclosed. A large lid makes it easy to add materials and turn the pile, and bottom doors let you harvest finished compost while the bin is still active.
Yard Trimmings Bin
If you only need to compost leaves, grass clippings, and prunings, a simple yard trimmings bin is a great low-cost option. These open bins made from plastic or metal mesh are not rodent-resistant, so they should only be used for plant materials — not food scraps. They're easy to build from hardware cloth (see the E-Z Wire Bin instructions below) and are useful for stockpiling browns to mix with food scraps in a rodent-proof bin.
A Note on Compost Tumblers
Compost tumblers are widely sold, but we generally don't recommend them. They are not a beginner-friendly system and require advanced skills to monitor and manage. Because tumblers are sealed and elevated, vital decomposers like earthworms and sow bugs can't reach the material inside to help break materials down. A standard bin placed directly on the ground will produce better compost, faster.
Composting Food Scraps in Small Spaces
Don't have room for a backyard bin? A worm bin is a compact, odor-free way to turn fruit and vegetable scraps into rich fertilizer — perfect for apartments, patios, or classrooms. Red worms do the work for you, and the finished "castings" are one of the best soil amendments you can get.
Build Your Own Compost Bin
Building your own bin lets you customize the size and design for your yard. Below are plans for three DIY options, from a simple wire hoop you can make in minutes to a full three-bin system for serious composters. All plans are also available in our printable guide.
- E-Z Wire Bin — Simple wire hoop, yard trimmings only, $15-$30
- Three-Bin System — Large capacity with separate turning/aging bins, $175-$200
- All-Wood Bin — Rodent-resistant with front doors and sifter lid, $100-$120
E-Z Wire Bin
- For yard trimmings only (unless made rodent-resistant)
- Requires minimum 3'x3' yard space
- Not rodent-resistant
- Produces small to large amounts of compost
- Very easy to build
- $15-$30 for new materials
Materials
- 10'x3' piece of heavy-duty wire mesh fencing or hardware cloth (1/4", 1/2", 1", or 2" mesh)
- (4) 5" pieces of 14-gauge insulated wire or other easy-to-twist wire larger than 12 gauge
Assembly & Installation
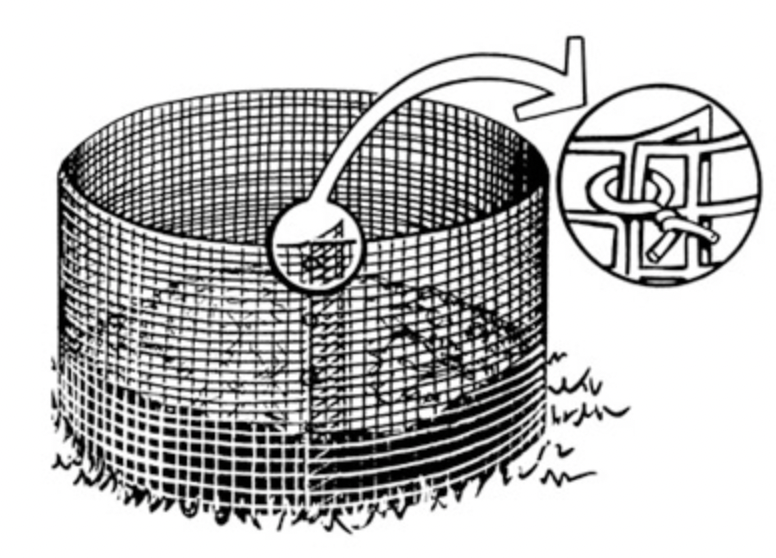
- Form hardware cloth into a hoop, overlapping the ends 3-4 inches.
- Attach ends of hardware cloth with 5" pieces of wire.
- Install in a location protected from wind, with enough space to turn the compost easily (about 3'x6'). To turn, unfasten the hoop, set it up in an adjacent spot, then fork the compost into the hoop in its new location.
Three-Bin System
- For yard trimmings, or food scraps mixed with yard trimmings
- Requires minimum 3'x9' of yard space
- Excellent for hot composting with removable front slats for easy turning
- Separate bins for turning, aging, and storing compostables
- Handles large amounts of material
- Carpentry skills needed
- $175-$200 for new materials
Materials
- 2x4" wood*: (8) 31-1/2", (8) 36", (4) 9', and (4) 29" pieces
- 2x6" wood: (4) 36" pieces
- 2x2" wood: (6) 34-1/2", (1) 9', and (4) 29" pieces
- 1x6" wood: (19) 31" pieces
- 1/4" mesh hardware cloth: 30'x3'
- Carriage bolts (3-1/2"x3/8"): 12, with washers and nuts
- 12-penny galvanized nails: 2 pounds
- 8-penny galvanized nails: 1 pound
- Poultry wire staples: 1 pound
- Corrugated fiberglass (4 oz.): (2) 8'x26" pieces
- Gasketed roofing nails: (40)
- Wiggle molding: 18 feet
- 3" hinges (zinc plated, galvanized, or brass): (3)
- 4" flat corner braces: (4) with 1" wood screws
- 4" flat "T" braces: (4) with 1" wood screws
- (4) hook eyes and 8' of strong twine or chain
*Bin dimensions based on planed wood.
Tools
- Power saw (use eye protection) or hand saw
- Drill with 3/8" and 1/16" bits
- Screwdriver
- Hammer
- Tin snips
- Tape measure
- Pencil
- Socket or wrench
- Carpenter's square
Assembly
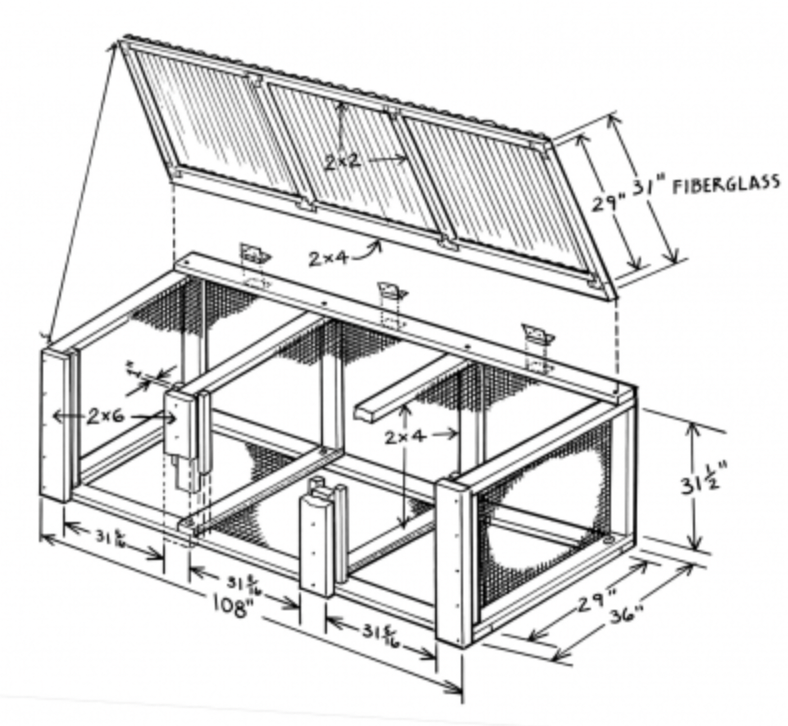
1. Main Structure
Butt-nail two 31-1/2" and two 36" 2x4s together with 12-penny nails to form each of four screen dividers. Cut four 36x33-1/2" wire mesh pieces and staple (every 4") to frames after checking for squareness. Bolt dividers to three 9' 2x4s as shown (inside measurement between dividers should be 31-5/16"). Tack in 29" 2x4s as shown. Staple one 9'x3' piece of wire mesh (every 4") to the back of the structure, and one 9'x3' piece to the bottom.
2. Slats and Slat Tracks
Nail 2x6s to the front of the dividers. Nail 34-1/2" 2x2s onto frames as shown. Leave at least 1" for the slats to slide in. The last slat of each bin section needs to be cut lengthwise to fit.
3. Lid
Assemble lid frame as shown, with flat corner and "T" braces on the bottom side. Pre-drill nail holes every couple of feet into wiggle molding humps, and attach molding to the 9' 2x2 and 9' 2x4 with 8-penny nails. Note the position of wiggle molding on the 2x4 in the drawing. Cut fiberglass into five 32" pieces with tin snips. Pre-drill fiberglass and wiggle molding on top of every third hump, and nail together with gasketed nails. Overlay fiberglass pieces at least one channel wide, and trim off excess before attaching the last piece. Attach the lid to the frame with hinges. Attach heavy-duty twine or chain to the lid and main frame with hook eyes as shown (to prevent the lid from falling all the way back).
Two-Bin Adaptation: You can make a two-bin version by carefully adapting the materials list, drawings, and assembly instructions.
All-Wood Bin
- For yard trimmings, or food scraps mixed with yard trimmings
- Two front doors for easy harvesting and turning
- Top doubles as a compost sifter
- Full wire mesh lining for rodent resistance
- Produces small to large amounts of compost
- Carpentry skills needed
- $100-$120 for new materials
Materials
- (8) 8' 1x6 wood
- (2) 8' 2x4 wood
- (1) 10' 2x4 wood
- (3) 6' 1x4 wood
- 15' of 1/4" wire mesh hardware cloth
- (4) 5" drawer handles
- (8) 1-1/2" hooks and eyes
- (8) 4" corner brackets with 1/2" wood screws
- Waterproof wood glue
- (20+) 8-penny galvanized nails
- (125+) 6-penny galvanized nails or screws
- (250+) 3/4" poultry wire staples
*Bin dimensions based on planed wood.
Tools
- Power saw (use eye protection) or hand saw
- Screwdriver
- Hammer
- Tape measure
- Pencil
- Square
- Drill with 1/16" bit
- Sandpaper
Assembly
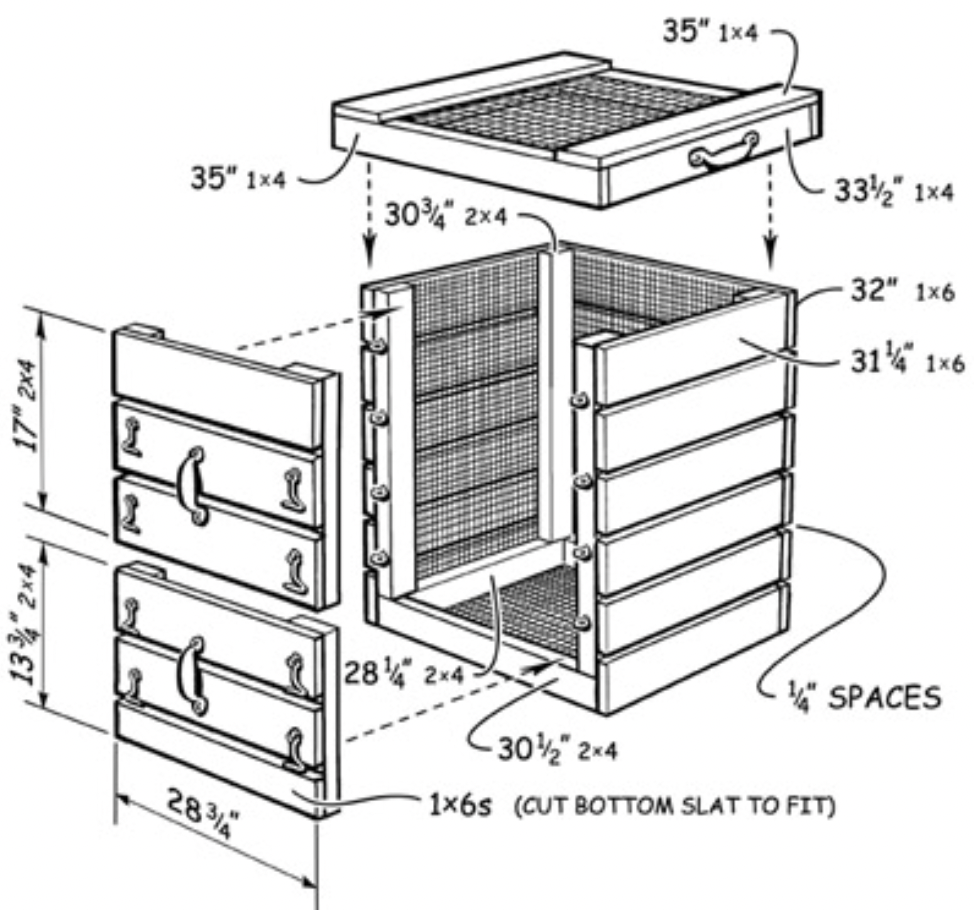
Glue all wood pieces before nailing.
- Nail the 2x4 bottom frame together with larger nails. The finished dimension should be 30-1/2"x31-1/4".
- Build sides by nailing the bottom and top 31-1/4" 1x6s to the 2x4s (use smaller nails). The bottom 1x6s should hang down 3-1/2" below the 2x4 uprights (see overhang detail). Fill in the remaining 1x6s equally spaced, with no gaps larger than 1/4".
- Attach sides to the base by nailing the 3-1/2" overhang to the base (with smaller nails). Toenail the 2x4 uprights into the bottom frame with larger nails.
- Nail the six 32" 1x6s to the back, starting with the top and bottom pieces, then filling in the remaining four spaced equally.
- Before cutting pieces for the front doors, measure the actual opening at the front of the bin. Cut the 1x6s 1/8"-1/4" smaller than the opening. Build the top door by nailing three 1x6s to the two 17-3/4" 2x4s with 1/4" between each board. Build the bottom door by nailing on the top two 1x6s (1/4" apart), then measuring the remaining space and cutting the last 1x6 lengthwise to fit.
- Attach eyes to the front 2x4 uprights, and hooks to the front doors as drawn.
- Build the lid by pre-drilling and tacking together as drawn (using smaller nails). The finished dimension should be 35"x35" and square. Pre-drill and screw the corner brackets to the inside corners, then attach the top 1x4s. Cut a 33"x36" piece of wire screen and staple it in as shown in the detail drawing.
- Cut the remaining screen to fit. Staple the side, back, and door pieces inside the bin on the 1x6s (not over the 2x4s). Staple the bottom piece onto the underside of the bin.